CVS Starter Guide: SmartCVS How-To: Initial Check-Out
I'm operating on the assumption that you've already downloaded (from Download SmartCVS) and installed SmartCVS. I'm not going to duplicate their documentation efforts here. 
I will note, however, if you run SmartCVS for the first time and it can't contact the website, simply retry until it asks if you want to use the "Foundation Edition". That's the free version, so unless you've purchased the Pro version, that's what you want anyway.
Odds are, you'll only have to go through these steps once.
Checking Out the NarniaMUF project from the Repository
Before you can do much of anything, you have to check out the NarniaMUF 'project'--the collection of programs--from the repository.
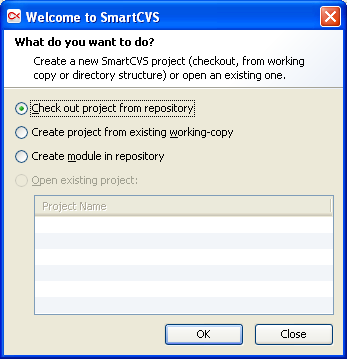
- If you're running SmartCVS for the first time, it will prompt you with a wizard dialog titled "Welcome to SmartCVS" for that purpose. Otherwise, you can click on "Project" and then "Check-Out" to get to the dialog shown on the left.
- You should be at a "Welcome to SmartCVS" dialog. Choose the "Check out project from repository" radio button and Click OK.
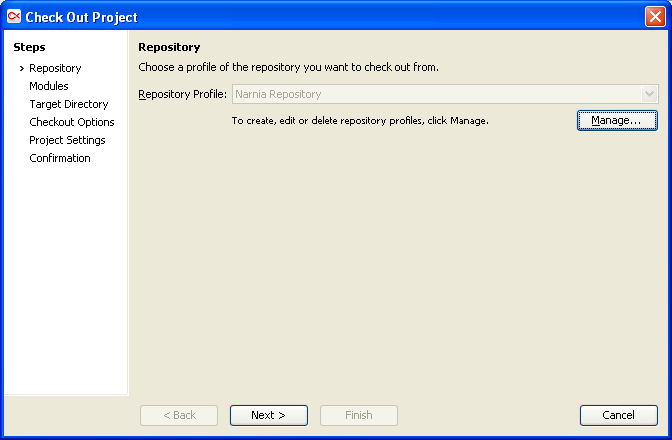
- Next, it'll ask which "Repository Profile" you want. Since you've not checked out from this repository before, you'll have to make one. Click "Manage".
- On the "Repository Profiles" Dialog, click the "Add" button
- On the "Add Repository Profile" Dialog: Fill out as follows:
- Access Method: Choose 'pserver'
- Username: your username
- Server Name: muck.narniamuck.org
- Repository Path: /usr/local/src/cvsroot
- Server Port: Default
Once you have it all filled in, click "Next".
- The next screen will ask for your password, enter it and click "Next".
- The next screen asks if you want to use the location as the profile name. I recommend choosing "use this profile name" and giving it a more intelligible name, such as "Narnia Repository".
- When you're satisfied with the profile name, click "Finish".
- Then click "OK" to get out of the manage profiles dialog.
- If "Narnia Repository"1 is the only profile (for instance, because this is your first time running SmartCVS) then it will have filled it in for you on the "Check Out Project" Dialog. Otherwise you'll need to select the correct repository profile.
- Click "Next", it will work for a moment and then the next dialog, Modules is shown. A browse repository box with "NarniaMUF" underneath "Narnia Repository" should appear.
- Select "NarniaMUF" and click next.
- The next dialog will ask "Local Directory" decide where you want it stored on your computer. I can't help you with this one. I'd choose somewhere you'll remember where to find it--especially from your favorite plain text editor. Keep in mind it will create a directory within the one you specify called "NarniaMUF". You can choose to change this by changing the "Alternative Path" field.
- After you've selected a local directory to store your local copy of the files in, click "Next".
- The next screen, "Check out Options", offers several options, none of which you'll need to change, so click "Next" again.
- And again with "Project Settings"..click Next.
- The final screen "Confirmation"--look over the settings, see if anything's out of place. It is possible to use the "Back" button to go back to prior settings to change them. Otherwise, click "Finish".
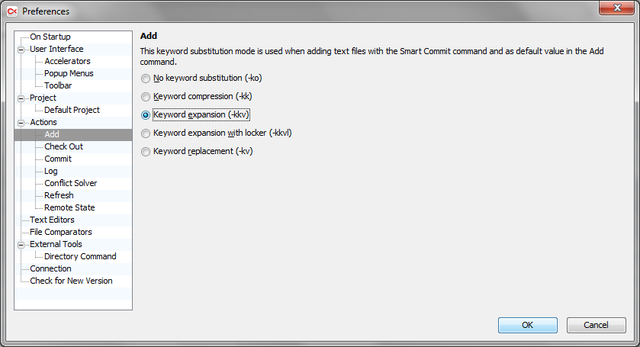
- Once you start adding new files to the repository, you need to make sure that special keywords like $Revision$ and $Log$ in the comments get properly expanded. This won't happen by default, so change the default now so that you don't have to worry about it again. Select Edit | Preferences... (or SmartCVS | Preferences... in Mac OS). Then select Actions | Add on the preferences dialog box, and check off the option called Keyword expansion (-kkv).
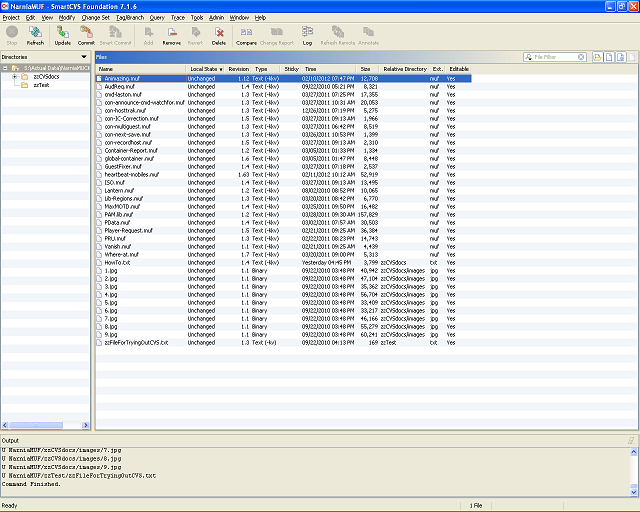
It will work for a moment and you'll see a series of filenames scroll by in the "Output" pane at the bottom of the window. Shortly, you'll see a list of files in the main pane of the window. Your checkout is complete.
- 1. Or whatever you named the profile...
- Login to post comments

